
D-Snap SV-SD370V - Mp3 player PANASONIC - Free user manual and instructions
Find the device manual for free D-Snap SV-SD370V PANASONIC in PDF.


| Product Type | Portable SD Audio Player |
| Model | Panasonic D-Snap SV-SD370V |
| Supported Audio Formats | AAC, WMA, MP3 (AUDIO mode); 16-bit linear PCM (VOICE mode) |
| Sampling Frequencies | 32 kHz, 44.1 kHz, 48 kHz (AUDIO); 8 kHz (VOICE) |
| Frequency Response | 20 Hz – 20,000 Hz (AUDIO); 120 Hz – 3,000 Hz (VOICE) |
| Number of Channels | Stereo (AUDIO playback, FM reception); Monaural (VOICE/FM recording) |
| FM Tuner Range | 87.5 MHz – 108.0 MHz (50 kHz steps) |
| Output Power | 3.3 mW + 3.3 mW (16 Ω) |
| Power Supply | Rechargeable Ni-MH battery (DC 1.2 V) or AC adaptor (input: AC 110-240 V, 50/60 Hz) |
| Battery Charging Time | Approx. 1 hour 30 minutes (via AC adaptor) |
| Battery Life (Audio Playback) | Approx. 25 hours (with included earphones, EQ Normal, EFFECT Off, AAC 96 kbps) |
| Battery Life (FM Reception) | Approx. 8 hours |
| Battery Life (Voice Recording) | Approx. 7 hours |
| Dimensions (W x H x D) | 44.0 mm x 54.7 mm x 11.7 mm (excluding projections) |
| Weight | Approx. 37.8 g (with rechargeable battery) |
| Recording Media | SD Memory Card (8 MB – 2 GB, FAT12/FAT16) |
| Maximum Recording Time (Voice/FM) | Approx. 12 hours per file; up to 33 hours on a 2 GB card |
| Key Features | Audio playback, FM radio with presets, voice/FM recording, mark registration, multiple EQ modes, A-B repeat, resume function |
| Accessories Included | Stereo earphones, AC adaptor, AC mains lead, USB cable, CD-ROM (SD-Jukebox, Voice Editing), rechargeable battery, strap |
| Maintenance & Care | Clean with a soft, dry cloth; do not use solvents; keep away from water and extreme temperatures |
| Safety Precautions | Do not disassemble, drop, or expose to moisture; use only specified accessories; keep battery away from children |
| Replaceable Parts | Rechargeable battery is user-replaceable; SD card is user-replaceable; earphones and other accessories can be replaced |
Frequently Asked Questions - D-Snap SV-SD370V PANASONIC
User questions about D-Snap SV-SD370V PANASONIC
0 question about this device. Answer the ones you know or ask your own.
Ask a new question about this device
Download the instructions for your Mp3 player in PDF format for free! Find your manual D-Snap SV-SD370V - PANASONIC and take your electronic device back in hand. On this page are published all the documents necessary for the use of your device. D-Snap SV-SD370V by PANASONIC.
USER MANUAL D-Snap SV-SD370V PANASONIC
natural_image
Illustration of two electronic devices with earbuds and speakers (no text or symbols)

Panasonic®
Operating Instructions
SD Audio Player
Model No. SV-SD370V
SV-SD310
SV-SD570V
SV-SD510

natural_image
Abstract geometric shape resembling a stylized letter 'D' with rounded corners, set against a gray background (no text or symbols)Before use, please read these instructions completely.
Contents
Caution for AC mains lead 2
Introduction...... 4
Accessories 8
Location of Controls.... 11
Operating environment for the software on the CD-ROM ..... 13
Installing SD-Jukebox 14
Starting SD-Jukebox.... 16
Installing Voice Editing...... 17
Starting Voice Editing 18
Connecting to a PC 19
Formatting SD Memory card ..... 20
Power supply preparations ..... 21
Inserting and removing SD Memory card .... 24
How to use SV-SD370V/ SV-SD570V (basic) 25
How to use SV-SD310/ SV-SD510 (basic)......26
Convenient functions .....26
Playing tracks (AUDIO mode).....27
Grouping favourite tracks (Registering marks)......32
Using the FM radio (FM TUNER mode) ....33
Recording the FM radio....35
Voice recording (VOICE REC mode).....35
Playing recorded files (VOICE PLAY mode)......37
Mode menus....39
Indications 40
Care and use......42
Troubleshooting guide 44
Specifications 46
Caution for AC mains lead
(For United Kingdom and Hong Kong area)
("EB" or "GH" area code model only)
For your safety, please read the following text carefully.
This appliance is supplied with a moulded three pin mains plug for your safety and convenience.
A 5-ampere fuse is fitted in this plug.
Should the fuse need to be replaced please ensure that the replacement fuse has a rating of 5-ampere and that it is approved by ASTA or BSI to BS1362.
Check for the ASTA mark 📍 or the BSI mark ♥ on the body of the fuse.
If the plug contains a removable fuse cover you must ensure that it is refitted when the fuse is replaced.
If you lose the fuse cover the plug must not be used until a replacement cover is obtained.
A replacement fuse cover can be purchased from your local dealer.
CAUTION!
IF THE FITTED MOULDED PLUG IS UNSUITABLE FOR THE SOCKET OUTLET IN YOUR HOME THEN THE FUSE SHOULD BE REMOVED AND THE PLUG CUT OFF AND DISPOSED OF SAFELY. THERE IS A DANGER OF SEVERE ELECTRICAL SHOCK IF THE CUT OFF PLUG IS INSERTED INTO ANY 13-AMPERE SOCKET.
If a new plug is to be fitted please observe the wiring code as stated below.
If in any doubt please consult a qualified electrician.
IMPORTANT
The wires in this mains lead are coloured in accordance with the following code:
Blue: Neutral, Brown: Live.
As these colours may not correspond with the coloured markings identifying the terminals in your plug, proceed as follows:
The wire which is coloured Blue must be connected to the terminal which is marked with the letter N or coloured Black or Blue.
The wire which is coloured Brown must be connected to the terminal which is marked with the letter L or coloured Brown or Red.
WARNING: DO NOT CONNECT EITHER WIRE TO THE EARTH TERMINAL WHICH IS MARKED WITH THE LETTER E, BY THE EARTH SYMBOL ⊥ OR COLOURED GREEN OR GREEN/YELLOW.
THIS PLUG IS NOT WATERPROOF—KEEP DRY.
Before use
Remove the connector cover.
How to replace the fuse
The location of the fuse differ according to the type of AC mains plug (figures A and B).
Confirm the AC mains plug fitted and follow the instructions below. Illustrations may differ from actual AC mains plug.
-
Open the fuse cover with a screwdriver.
-
Replace the fuse and close or attach the fuse cover.


Introduction
Dear Customer
Thank you for purchasing this product.
Before connecting, operating or adjusting this product, please read the instructions completely. Please keep this manual for future reference.
These operating instructions cover the SV-SD370V, SV-SD310, SV-SD570V and SV-SD510. The illustrations in these operating instructions are for the model SV-SD370V and SV-SD570V, but part of the description is for other models.
Please note that the actual controls and components, menu items, etc. of your SD Audio Player may look somewhat different from those shown in the illustrations in these Operating Instructions.
WARNING:
TO REDUCE THE RISK OF FIRE, ELECTRIC SHOCK OR PRODUCT DAMAGE, DO NOT EXPOSE THIS APPARATUS TO RAIN, MOISTURE, DRIPPING OR SPLASHING AND THAT NO OBJECTS FILLED WITH LIQUIDS, SUCH AS VASES, SHALL BE PLACED ON THE APPARATUS.
The unit is in the standby condition when the AC adaptor is connected. The primary circuit is always “live” as long as the AC adaptor is connected to an electrical outlet.
The socket outlet shall be installed near the equipment and easily accessible or the mains plug or an appliance coupler shall remain readily operable.
Marking sign is located on bottom of the unit.
This product may receive radio interference caused by mobile telephones during use. If such interference is apparent, please increase separation between the product and the mobile telephone.
To reduce risk of radio interference caused by headphones or earphones, only use adequate accessories with cable length less than 3 m.
Insertion of connector
Even when the connector is perfectly inserted, depending on the type of inlet used, the front part of the connector may jut out as shown in the drawing. However there is no problem using the unit.
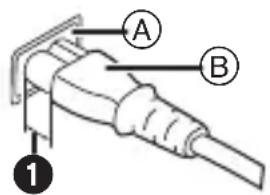
① Approx. 6 mm
Ⓐ Appliance inlet
⑧ Connector
-If you see this symbol-
Information on Disposal for Users of Waste Electrical & Electronic Equipment (private households)

natural_image
Symbol of a trash bin crossed with no text or labels, accompanied by a black rectangular block below (no readable text or symbols)This symbol on the products and/or accompanying documents means that used electrical and electronic products should not be mixed with general household waste.
For proper treatment, recovery and recycling, please take these products to designated collection
points, where they will be accepted on a free of charge basis.
Alternatively, in some countries you may be able to return your products to your local retailer upon the purchase of an equivalent new product.
Disposing of this product correctly will help to save valuable resources and prevent any potential negative effects on human health and the environment which could otherwise arise from inappropriate waste handling. Please contact your local authority for further details of your nearest designated collection point.
Penalties may be applicable for incorrect disposal of this waste, in accordance with national legislation.
For business users in the European Union
If you wish to discard electrical and electronic equipment, please contact your dealer or supplier for further information.
Information on Disposal in other Countries outside the European Union
This symbol is only valid in the European Union.
If you wish to discard this product, please contact your local authorities or dealer and ask for the correct method of disposal.
- “EB” on the packaging indicates the United Kingdom.
- Panasonic will in no way be liable for any losses of data caused by this product.
- Panasonic will also in no way be liable if you are unable to record due to a problem with this unit or an SD Memory card.
• SD logo is a trademark.
- miniSD ^TM is a trademark of SD Card Association.
- Microsoft and Windows are either registered trademarks or trademarks of Microsoft Corporation in the United States and/or other countries.
- WMA (Windows Media™ Audio) is a compression format developed by Microsoft Corporation. It achieves the same sound quality as MP3 with a file size that is smaller than that of MP3.
- Portions of this product are protected under copyright law and are provided under license by ARIS/SOLANA/4C.
- Intel, Pentium and Celeron are registered trademarks or trademarks of Intel Corporation in the United States and other countries.
- IBM and PC/AT are registered trademarks of International Business Machines Corporation of the U.S.
- Macintosh is a registered trademark of Apple Computer, Inc. of the U.S. in both the United States and other countries.
- Adobe and its logo, Acrobat, and Acrobat Reader are trademarks of Adobe Systems Incorporated.
- Gracenote® and CDDB® are registered trademarks of Gracenote. The Gracenote logo and logotype, the Gracenote CDDB logo and logotype, and the “Powered by Gracenote” logo are trademarks of Gracenote.
- CD and music-related data from Gracenote, Inc., copyright © 2000–2003 Gracenote. Gracenote CDDB®
Client Software, copyright 2000–2003 Gracenote. This product and service may practice one or more of the following U.S.
Patents: #5,987,523; #6,061,680; #6,154,773, #6,161,132, #6,230,192, #6,230,207, #6,240,459, #6,330,593, and other patents issued or pending.
- Other names of systems and products mentioned in these instructions are usually the registered trademarks or trademarks of the manufacturers who developed the system or product concerned. The ^TM and ^® marks are not used to in these Operating Instructions.
- This product is protected by certain intellectual property rights of Microsoft Corporation and third parties. Use or distribution of such technology outside of this product is prohibited without a license from Microsoft or an authorized Microsoft subsidiary and third parties.

- Licensed AAC patents (U.S. patent numbers);
| 08/937,950 | 5 752 225 | 5,235,671 | 98/03036 | 08/211,547 | 5,197,087 | 5,548,574 |
| 5848391 | 5,394,473 | 07/640,550 | 5,227,788 | 5,703,999 | 5,490,170 | 08/506,729 |
| 5,291,557 | 5,583,962 | 5,579,430 | 5,285,498 | 08/557,046 | 5,264,846 | 08/576,495 |
| 5,451,954 | 5,274,740 | 08/678,666 | 5,481,614 | 08/894,844 | 5,268,685 | 5,717,821 |
| 5 400 433 | 5,633,981 | 98/03037 | 5,592,584 | 5,299,238 | 5,375,189 | 08/392,756 |
| 5,222,189 | 5 297 236 | 97/02875 | 5,781,888 | 5,299,239 | 5,581,654 | |
| 5,357,594 | 4,914,701 | 97/02874 | 08/039,478 | 5,299,240 | 05-183,988 |
For the United Kingdom and Republic of Ireland
■ Sales and Support Information
Customer Care Centre
- For customers within the UK: 08705 357357
- For customers within the Republic of Ireland: 01 289 8333
- Visit our website for product information
• E-mail: customer.care@panasonic.co.uk
Technical Support for AV Software
• For UK, ROI: 08701 505610
Direct Sales at Panasonic UK
- Order accessory and consumable items for your product with ease and confidence by phoning our Customer Care Centre Monday–Thursday 9.00 a.m.–5.30 p.m., Friday 9.30 a.m.–5.30 p.m. (Excluding public holidays)
- Or go on line through our Internet Accessory ordering application at www.panasonic.co.uk.
- Most major credit and debit cards accepted.
- All enquiries transactions and distribution facilities are provided directly by Panasonic UK Ltd.
- It couldn't be simpler!
- Also available through our Internet is direct shopping for a wide range of finished products, take a browse on our website for further details.
- Interested in purchasing an extended guarantee? Please call 0870 240 6284 or visit our website www.panasonic.co.uk/guarantee.
Accessories
SV-SD370V/SV-SD310
□ Stereo earphones
(LOBAB0000206)
□ AC mains lead
For the United Kingdom and
Hong Kong area
(K2CT3CA00004)
For Australia and New Zealand
(K2CJ2DA00008)
For other areas
(K2CQ2CA00006)
□ CD-ROM (SD-Jukebox
Ver.5.1 LE/Voice Editing
Ver.1.0 LE for D-snap Audio)
□ AC adaptor
For Europe, United Kingdom,
Hong Kong, Australia and New
Zealand (VSK0673)
For other areas (VSK0674)
☐ USB cable (K1HA08CD0007)
□ Nickel-metal hydride
rechargeable battery
(RFKFHAZ10EM1 with case)
□ Strap
(VFC4028)
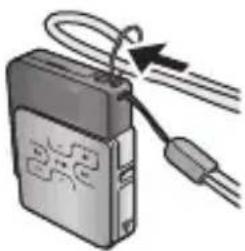
natural_image
Illustration of a medical device with attached wires and a connector (no text or symbols)SV-SD570V/SV-SD510
□ Stereo earphones
(LOBAB0000206)
□ AC mains lead
For the United Kingdom and
Hong Kong area
(K2CT3CA00004)
For other areas
(K2CQ2CA00006)
□ CD-ROM (SD-Jukebox
Ver.5.1 LE/Voice Editing
Ver.1.0 LE for D-snap Audio)
□ AC adaptor
For Europe, United Kingdom
and Hong Kong (VSK0673)
For other areas (VSK0674)
☐ USB cable (K1HA08CD0007)
□ Nickel-metal hydride rechargeable battery
(RFKFHAZ10EM1 with case)
□ Strap holder with
earphones (SV-SD570V only)
(RFEV338PAKT)

natural_image
Illustration of a pair of eyeglasses with straps and lenses (no text or symbols)□ Arm band (SV-SD510 only)
(RFE0192)
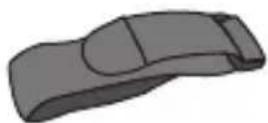
□ Clip holder
(RFC0112-K)
1
2

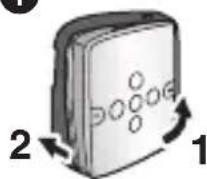
① How to attach
② How to detach
- Hold the unit firmly and then press the hole on the back of the clip holder to detach the unit.
- The clip holder is designed for the included stereo earphones. If you attach other earphones, you may not be able to use it.
■ Attaching/Detaching the strap holder with earphones (SV-SD570V only)
You can enjoy the D-snap Audio while active by using the strap holder with earphones.

1. Insert the plug for the strap holder with earphones into the earphones jack on the unit.
- Insert the plug as far as it will go.
2. Place the covers ② over the sides ① of the unit.
If the strap becomes twisted, turn the toggle to adjust it.

The toggle will come apart if pulled strongly. If the toggle comes apart, attach it again.
When not using the earphones for the strap holder with earphones, attach them to the clips on the strap.

natural_image
Medical illustration showing a catheter insertion into a device (no text or labels)When detaching the strap holder with earphones, take off the covers and then remove the plug.

natural_image
Illustration of a medical device with a pin and circular components (no text or symbols)- The cord of the strap holder with earphones is shorter than the cord of the stereo earphones so receiver sensitivity may decrease.
- You cannot insert or remove the rechargeable battery and the SD Memory card or connect the AC adaptor and USB cable when the strap holder with earphones are attached.
■ Attaching the arm band (SV-SD510 only)
- Put the unit into the clip holder. (P9)
- Insert the clip of the clip holder into the loop on the arm band.
- Undo the fabric fastener and fit the arm band onto your arm.
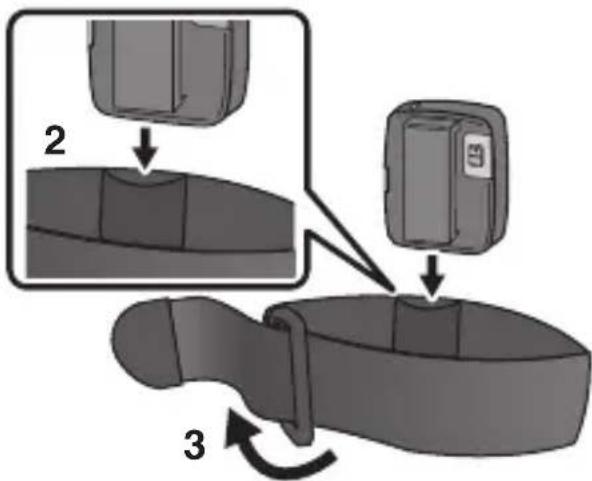
- Do up the fabric fastener.

natural_image
Illustration of a human forearm and hand with a bandage, showing a curved arrow indicating motion (no text or symbols)To prevent the unit from falling;
- Fit it firmly into the clip holder.
- Firmly insert the clip of the clip holder into the loop.
- Do not swing the assembled unit around.
■ SD Memory card (not included)
- This unit supports SD Memory cards and miniSD card (miniSD card requires miniSD card adaptor) formatted in a FAT12 file system or a FAT16 file system based on SD Memory card specifications.
- You can use SD Memory cards with the following capacities (from 8 MB to 2 GB) in this unit. (Panasonic cards are recommended.)
8 MB, 16 MB, 32 MB, 64 MB, 1 2 8 M B, 2 5 6 M B, 5 1 2 M B, 1 and 2 GB (maximum)
- Usable memory is slightly less than the card capacity.
- Please confirm the latest information on the following website: http://panasonic.co.jp/pavc/global/cs
Location of Controls
■ SV-SD370V/SV-SD310
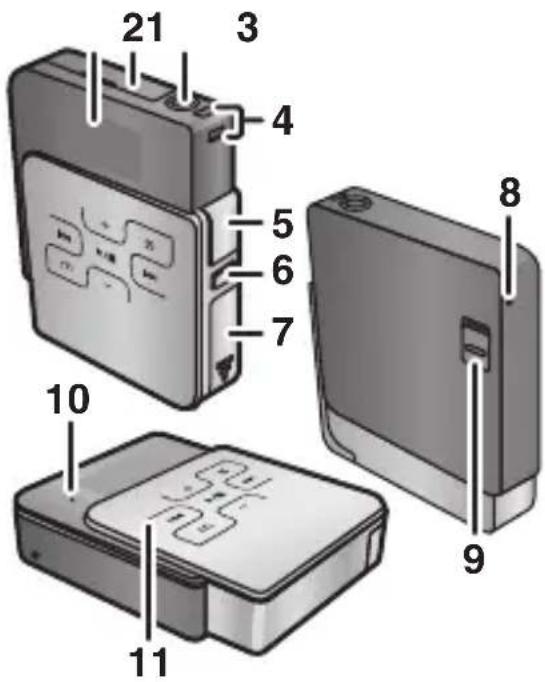
1. Display panel
- In order to save power, the display turns off after a short while. Press the volume button (+ or −) or slide the HOLD switch to turn the display on again.
2. Card lid
4. Strap fixture
- Earphones jack (∅ 3.5 mm stereo mini jack)
- USB lid [ψ]
- Mark button [MARK]
- Battery lid
- Microphone [MIC] (SV-SD370V only)
- Hold switch [HOLD]
10.Status indicator
Blinks:
During charging, play etc.
(Refer to P43 for details.)
Lights:
While stopped or when the power is turned on
Off:
When the power is turned off or charging finishes
11.Operation buttons
▶/■ Play/Stop
- This is also used to turn the power on/off.
On: Press the button briefly.
Off: Press and hold the button for more than approximately 2 seconds.
▶▶ Skip/Search (Fast-forward)
Skip/Search (Fast-rewind)
+, - Volume
m Mode switch (SV-SD370V), Menu display (SV-SD310)
S Select audio play playlist/Select voice play file (Voice play is available only on SV-SD370V.)
■ SV-SD570V/SV-SD510

1. Display panel
- Indicators may be difficult to see under direct sunlight or fluorescent light.
2. Card lid
- Earphones jack (∅ 3.5 mm stereo mini jack)
4. Strap fixture
-
USB lid [∅]
-
Mark button [MARK]
-
Battery lid
-
Microphone [MIC] (SV-SD570V only)
-
Hold switch [HOLD]
10.Status indicator
Blinks:
During charging, play etc.
(Refer to P43 for details.)
Lights:
While stopped or when the power is turned on
Off:
When the power is turned off or charging finishes
11.Operation buttons
▶/■ Play/Stop
- This is also used to turn the power on/off.
On: Press the button briefly.
Off: Press and hold the button for more than approximately 2 seconds.
▶▶ Skip/Search (Fast-forward)
Skip/Search (Fast-rewind)
+, - Volume
m Mode switch (SV-SD570V), Menu display (SV-SD510)
S Select audio play playlist/Select voice play file (Voice play is available only on SV-SD570V.)
- In order to save power, the display and the operation buttons turn off after a short while. Press the volume button (+ or −) or slide the Hold switch to turn the display on and light up the operation buttons again.
- The operation buttons will not light when the battery indicator is blinking.
Operating environment for the software on the CD-ROM
Personal computer:
IBM PC/AT compatible personal computer
OS:
Microsoft® Windows® 2000 Professional Service Pack 2, 3, 4
Microsoft® Windows® XP Home Edition/Professional, or Service Pack 1, 2 supported
CPU: Intel ^® Pentium ^® III 500 MHz or higher
RAM: 256 MB or more
Display: High Color (16 bit) or more
Desktop resolution of 800 × 600 pixels or more ( 1024 × 768 pixels or more recommended)
Free hard disk space: 150 MB or more
- Approximately 100 MB of free hard disk space when installing only SD-Jukebox.
- Approximately 50 MB of free hard disk space when installing only Voice Editing.
- Additional free hard disk space may be necessary depending on the Windows® version and voice file being used.
- Approximately 25 MB of additional free hard disk space when installing Acrobat® Reader® (included).
- Approximately 50 MB of additional free hard disk space when installing DirectX® 9.0b (included).
Necessary software: DirectX ^® 8.1 or later, Internet Explorer 6 or later Sound: Windows compatible sound device
Drive: CD-ROM drive
- A CD-ROM drive capable of digital recording is required. Four-speed or higher is recommended.
- Recording can not work properly with CD-ROM drives connected through an IEEE1394 connection.
Interface: USB port
- When devices are connected through USB hub or by using USB extension cable, operation is not guaranteed.
Other requirements: If you are using the CDDB function, then an Internet connection is also required.
- Even if the system requirements mentioned in these operating instructions are fulfilled, some personal computers can not be used.
- Operation is not guaranteed when used on Windows OSs except those above.
- These software are not compatible with Microsoft Windows ^® 3.1, Windows ^® 95, Windows ^® 98, Windows ^® 98SE, Windows ^® Me, Windows NT ^® and Macintosh.
- Operation on an upgraded OS is not guaranteed.
- Operation on an OS other than the one pre-installed is not guaranteed.
• Voice Editing is not compatible with a multi-CPU environment. - Multi-boot environment is not supported.
- Only available when the user is logged in as the system administrator.
• Voice Editing cannot be used by multiple users. - These software may not run properly on user-built computers.
• These software can not be used on 64-bit OS. - SD-Jukebox can not play and record music CDs that does not have a “” mark on the disc label.
- This system requirements are not guaranteed in the case that any other application runs.
- Depending on your computer system, you may experience problems such as being unable to record or use recorded music data. Please note that Matsushita is in no way liable for any music data you lose, or for any other direct or indirect damages.
Installing SD-Jukebox
SD-Jukebox is a software program for recording and managing music from audio CDs on your PC. SD-Jukebox also enables you to “check out” recorded tracks to SD Memory cards so you can enjoy the music on SD Audio players or other SD devices.
- Before installing the software, check your PC meets the system requirements. (P13)
- Before installing the software, close all other software applications which are running.
- Do not connect this unit to the PC until SD-Jukebox has finished installing.
SD-Jukebox incorporates copyright protection technology with encryption to support musicians and the music industry and protect the rights of lawful owners. Thus, the following restrictions apply when using SD-Jukebox.
- SD-Jukebox records audio data in an encrypted form on your PC's hard disk. Encrypted music cannot be used if you move or copy the files to other folders, drives, or PCs.
- Unique identification specific to your processor and hard disk is used for encryption. Thus, if you replace the processor or hard disk, previous audio data may no longer be available.

- When reinstalling the software, the serial number indicated on the CD-ROM package is necessary. Please keep the CD-ROM package in a safe place.
If Internet Explorer 6 or later is not installed on your PC, a confirmation screen is displayed.
Click [OK] to finish the installation. Install Internet Explorer 6 and then install SD-Jukebox again.
-
Turn on the PC and start Windows.
-
Insert the included CD-ROM into the CD-ROM drive.
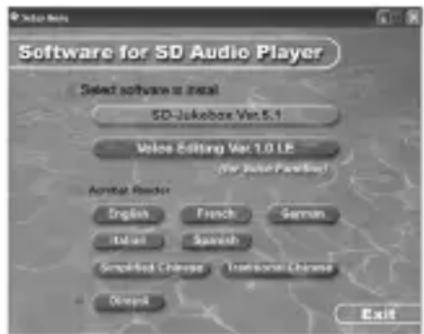
- The installer program starts automatically. If it does not start, refer to “If the installer program does not start automatically”.
3. Click [SD-Jukebox Ver.5.1].
-
Click [Next].
-
Click [Yes].
-
Enter [Serial No.] and [Name] and then click [Next].
- The serial number is indicated on the CD-ROM package.
-
Select the install destination and then click [Next].
-
Select the save destination for the music data and then click [Next].
-
Select the program folder and then click [Next].
- If you click [Yes] on the next screen displayed, the SD-Jukebox icon appears on the desktop after restarting the PC.
10.Click [Finish].
- Choose [Yes, I want to restart my computer now.]. The PC automatically restarts. The installation is now finished.
■ If the installer program does not start automatically
- From the Windows [start] menu, select [Run].
- Type [#: \autorun.exe] and click on [OK].
• “#:”
The ID of the CD-ROM drive that you inserted the CD-ROM into (Example:
When the CD-ROM drive is the D drive, [D:\autorun.exe])
- You can use upper or lower case letters in this step.
- Follow the on-screen instructions.
Starting SD-Jukebox
Double click on the SD-Jukebox icon on the desktop.

- If the icon is not on the desktop: from the [start] menu, select
[All Programs]→[Panasonic]→
[SD-JukeboxV5]→
[SD-JukeboxV5].
■ Take your music with you on an SD Memory card
You can only play music data on this unit that confirms to the SD-Audio standard.
You will need either PC software (the included SD-Jukebox etc.) or a stereo system that confirms to the SD-Audio standard for writing music data to an SD Memory card.
- If you want to play music data downloaded from a mobile phone, check that the music data confirms to the SD-Audio standard.

Recording CDs to your PC
- Start SD-Jukebox.
-
Insert a music CD in your PC's CD-ROM drive.
-
Click ②.
-
Select the checkbox next to the tracks to be imported.
-
Click ③.
Transferring tracks from your PC to an SD Memory card
- Connect the PC and this unit with the USB cable.
- Click ①.
- Select the checkbox next to the tracks to be imported.
- Click ③.
When recording WMA/MP3 files to an SD Memory card, first import them with SD-Jukebox.
- For details on how to use SD-Jukebox and the bit rates that are compatible with WMA/MP3 files, refer to the PDF operating instructions for SD-Jukebox.
■ About the PDF operating instructions for SD-Jukebox
The operating instructions for SD-Jukebox are installed along with the application as a PDF file.
- You will need Adobe Acrobat Reader to read the file containing the operating instructions (PDF file).
Read the operating instructions (PDF file)
From the Windows [start] menu, select
[All Programs]→[Panasonic]→
[SD-JukeboxV5]→
[SD-JukeboxV5 Operating Instructions].
If the PDF operating instructions do not open
Insert the included CD-ROM into the PC's CD-ROM drive and follow the on-screen instructions to install Adobe Acrobat Reader.
only SV-SD370V SV-SD570V
Installing Voice Editing
Voice Editing is a software program for editing and managing voice recording files etc. recorded on your PC.
- SV-SD310/SV-SD510 does not include the Voice function so Voice Editing cannot be used even if you install it.
If another edition of Voice Editing has already been installed in your PC
You can use this. However, you may not be able to use some of the editing functions. It is recommended that you update Voice Editing so that you can use all the functions in the included software.
- Before installing the software, check your PC meets the system requirements. (P13)
- Before installing the software, close all other software applications which are running.
- Do not connect this unit to the PC until Voice Editing has finished installing.
- Turn on the PC and start Windows.
- Insert the included CD-ROM into the CD-ROM drive.
- The installer program starts automatically. If it does not start, refer to “If the installer program does not start automatically”.
- Click [Voice Editing Ver.1.0 LE].
- A language selection screen is displayed for selecting the installation language. Select a language and click [OK].
- Click [Next].
- Click [Yes].
- Select the install destination and then click [Next].
- Select the program folder and then click [Next].
- Click [Finish].
- Choose [Yes, I want to restart my computer now.]. The PC automatically restarts. The installation is now finished.
only SV-SD370V SV-SD570V
Starting Voice Editing

Double click on the Voice Editing icon on the desktop.
- You can also start Voice Editing using the Windows [start] menu. From the Windows [start] menu, select [All Programs]→ [Panasonic]→ [Voice Editing]→ [Voice Editing].
■ About the PDF operating instructions for Voice Editing
The operating instructions for Voice Editing are installed along with the application as a PDF file.
- You will need Adobe Acrobat Reader to read the file containing the operating instructions (PDF file).
Read the operating instructions (PDF file)
From the Windows [start] menu, select
[All Programs]→ [Panasonic]→ [Voice Editing]→
[Voice Editing Operating Instructions].
- Refer to P17 if the file containing the operating instructions does not open.
Connecting to a PC
Insert a rechargeable battery and an SD Memory card.
(P21, 24)
- The unit will not operate when using the USB cable only. Insert the rechargeable battery.
- Turn the PC on.
SV-SD370V/SV-SD310

SV-SD570V/SV-SD510
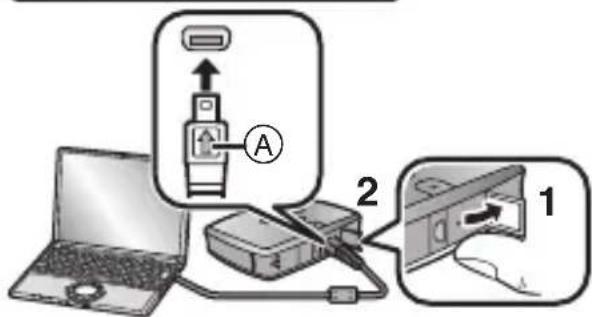
-
Open the USB lid.
-
Plug USB cable straight in with the arrow Ⓐ facing upwards.
- Check the shape of the USB terminal and insert straight in. Forcefully inserting it at the wrong angle or upside down will damage the terminal on this unit or the connecting equipment.
3. Connect to the PC's USB terminal.
- Use SD-Jukebox (included) for writing music to an SD Memory card, creating playlists and editing. (P16)

- Do not disconnect the USB cable while “ACCESSING” is displayed or open the battery lid while recording. This can cause the data on the SD Memory card to be lost, or render it unusable.
- Use only the included USB cable to avoid damage to the unit. Do not use the included USB cable with any other equipment.
- If the USB connection is not recognised, disconnect the USB cable and reconnect it.
- If you start (restart) your computer or it goes into power save mode while connected to the unit, it may not recognise the unit. Disconnect the unit and then reconnect it or restart the computer and then reconnect the unit if this happens.
- Operation is not guaranteed when more than two items of USB equipment is connected to your computer or a USB hub or USB extension cable is used.
- Your computer may not start (restart) while the unit is connected. Disconnect the USB cable from the unit when starting (restarting) your computer.
■ Disconnecting the USB cable
Double click the [] icon in the task tray of the computer and follow the onscreen instructions to disconnect. (Depending on the settings of the computer, this may not be displayed.)
■ Data saving function
This unit functions as a USB reader/writer and is recognised by the PC as an external device. This enables data other than music data to be saved from the PC to an SD Memory card by drag and drop.
- Use SD-Jukebox (included) to save music data to an SD Memory card.
■ Folder structure of an SD Memory card used for this unit

flowchart
graph LR
    A["2 GB"] --> B["PRIVATE"]
    A --> C["SD_AUDIO"]
    B --> D["MEIGROUP"]
    C --> E["SDPLAYER"]
    D --> F["VOICE"]
    E --> F
- Do not move or erase these folders or files with Explorer etc. The unit will no longer be able to recognise the data on the SD Memory card.
Formatting SD Memory card
If this unit cannot recognise the SD Memory card properly or the recording on the card fails, formatting the card with SD-Jukebox is necessary.
- All the data on the card will be erased if it is formatted.
For details on how to format an SD Memory card, refer to the PDF operating instructions for SD-Jukebox.
- If you are using SV-SD370V/SV-SD570V, you can format an SD Memory card on the unit. (P37)
- If the SD Memory card is formatted on other equipment, the time spent for recording may become longer. Also, if the SD Memory card is formatted on a PC (Windows standard format function), you may not be able to use in it on this unit. In these cases, format the card with SD-Jukebox. (Refer to the PDF operating instructions for SD-Jukebox.)
Power supply preparations
Charge before initial use.
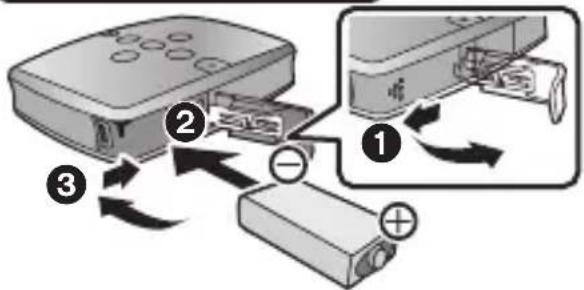
1. Insert the rechargeable battery.
SV-SD370V/SV-SD310
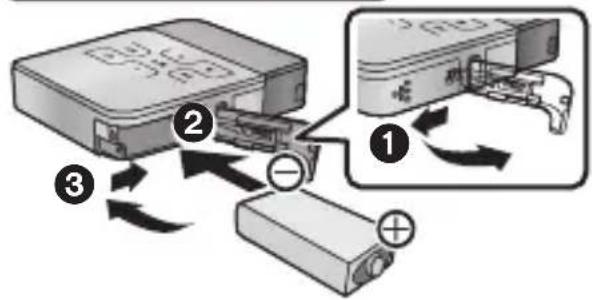
SV-SD570V/SV-SD510
flowchart
graph TD
    A["Device 1"] -->|①| B["Device 2"]
    B -->|②| C["Device 3"]
    C -->|③| D["Device 4"]
① Slide the battery lid in the direction of the arrow to open.
② Insert the rechargeable battery.
③ Close the battery lid.
2. Charge the rechargeable battery.
SV-SD370V/SV-SD310

SV-SD570V/SV-SD510

① Open the USB lid.
② Insert the AC adaptor cable straight in to the USB terminal with the arrow Ⓐ facing upwards.
- If it is forcibly inserted at a wrong angle or upside down, the terminals may be damaged and the unit or the connected equipment may malfunction.
③ Connect the AC mains lead to the AC adaptor, then the household mains socket.
Status indicator (If the unit is turned off before charging)
While charging: blinks (Intervals of about 2 seconds)
When charging finishes: goes out
- Full charging time (AC power supply): Approx. 1 hour 30 minutes
- The rechargeable battery can be charged during play however it is not fully charged. Turn off the unit to charge fully.
- If the battery is charged for 10 minutes when “EMPTY BATTERY” is displayed, the unit can be played for about 3 hours in [AUDIO] mode. (Depending on the surrounding temperature, and if the rechargeable battery is overcharged, the play time may be less.)
■ Charging from the PC
The rechargeable battery is charging while the unit is connected to your PC by USB cable. (P19)
Status indicator
While charging: blinks (Intervals of about 2 seconds)
When charging finishes: lights
When the status indicator lights, the charging is finished. However, the rechargeable battery is not fully charged. Use the AC adaptor to fully charge.

- The rechargeable battery can be charged even if it is not fully discharged.
- The AC adaptor is for use with this unit only. Do not use it for other equipment. Also, do not use an AC adaptor for other equipment with this unit.
■ Removing the rechargeable battery
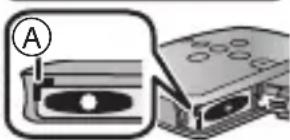
While moving the battery lock lever Ⓐ outward, point the bottom of the unit downwards with the door open to remove the battery.
SV-SD370V/SV-SD310

V-SD570V/SV-SD510
natural_image
Diagram showing a device with a labeled section (A) and its corresponding view of a device with circular components (no text or symbols present)- When not using the unit for a long time, remove the rechargeable battery. It is recommended that you put the rechargeable battery in the included rechargeable battery case after removing it.
- When the settings of the unit have been changed, do not remove the rechargeable battery until the unit is turned off. (The settings will not be saved.)
■ Turning on/off the unit
- The unit will not operate when using the AC adaptor only. Be sure to insert the rechargeable battery.
SV-SD370V/SV-SD310
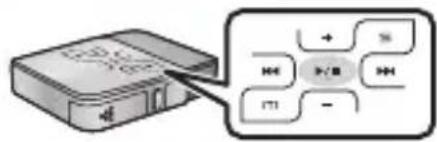
SV-SD570V/SV-SD510
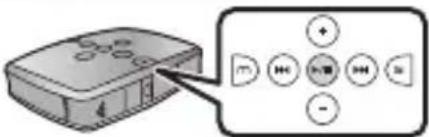
On: Press ▶/■.
- Even if BEEP in [SYSTEM] is set to [ON] (P31), a beep is not heard when you turn the power on.
Off: Press and hold ▶/■ for more than approximately 2 seconds.
- If BEEP in [SYSTEM] is set to [ON] (P31), a beep is heard when you turn the power off.
- You cannot turn off the unit while the MODE select screen (SV-SD370V/SV-SD570V only) or item select screen is displayed.
■ Battery indicator
The battery indicator appears on the display panel.
- After the battery indicator has blinked for a while, the unit will be turned off soon.
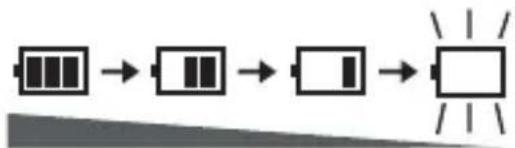
When the battery indicator is blinking
- The following operations are not possible.
— Mark register/remove
— FM recording ^ /Voice recording ^
— File erase *
*SV-SD370V/SV-SD570V only
- Operation buttons do not light up. (SV-SD570V/SV-SD510 only)
- To resolve these problems, reconnect the AC adaptor or fully charge the rechargeable battery and then operate the unit.
■ Using the AC adaptor
If the unit is powered by the AC adaptor, it can be used continuously.
- The unit will not operate when using the AC adaptor only. Be sure to insert the rechargeable battery.
- If the AC adaptor is connected during play, the play will stop. However this is not a malfunction.
- If the AC adaptor is connected during FM reception, the sound will stop being output for a while. However this is not a malfunction. (SV-SD370V/ SV-SD570V only)
- If the AC adaptor is connected during recording, the recording will stop. Start recording again. (SV-SD370V/ SV-SD570V only)

- The AC adaptor is for use with this unit only. Do not use it for other equipment. Also, do not use an AC adaptor for other equipment with this unit.
Inserting and removing SD Memory card
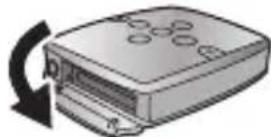
- Insert and remove the SD Memory card when the unit is turned off.
- Open the card lid.
SV-SD370V/SV-SD310

SV-SD570V/SV-SD510
- Insert the SD Memory card.
SV-SD370V/SV-SD310

SV-SD570V/SV-SD510

natural_image
Diagram showing a device with an attached card and a folder, no text or symbols present- Face the label Ⓐ upward and insert the card straight as far as it goes.

- MultiMediaCards (MMC) cannot be used.
- While “ACCESSING CARD” appears, the card is being read from or written to. Do not turn off the unit or remove the card. Such action may result in malfunction or loss of the card’s contents.
To remove the SD Memory card
① Open the card lid.
② Press the card until it clicks.
③ Pull it straight out.
■ SD Memory card write-protect switch
If the switch is moved to the [LOCK] position, data cannot be written or erased and the card cannot be formatted.
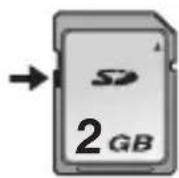
■ miniSD card
Insert the miniSD card into the miniSD card adaptor and then insert the miniSD card adaptor into this unit.

natural_image
Diagram showing a computer monitor icon interacting with a folder (no text or symbols present)How to use SV-SD370V/SV-SD570V (basic)
■ Turning on the unit
- Press ▶/■.
■ Changing the mode
- Pressn .
- Press |◀◀ or ▶▶| to select mode and then press ▶/■.
AUDIO (P27)
Play music files.

FM FM TUNER (P33)
Listen to the FM radio.
VOICE PLAY (P37)
Play Tuner recording and Voice recording files.

VOICE REC (P35)
Record voices.

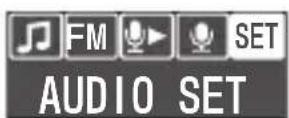
SET AUDIO SET (P30) (FM TUNER SET (P33), VOICE SET (P38), REC SET (P37))
Change the settings in a selected mode.

- Use SD-Jukebox to record music files from a CD to a SD Memory card. You cannot play WMA/MP3 files that have been saved to an SD Memory card by drag and drop. For details on how to record music, refer to P16.
How to use SV-SD310/SV-SD510 (basic)
■ Turning on the unit/playing tracks
1. Press ▶/■.
- If an SD Memory Card with recorded tracks is inserted in the unit, play starts automatically from where it was last stopped when the power is turned on.
The image is too blurry to recognize any text content.
- Use SD-Jukebox to record music files from a CD to a SD Memory card. You cannot play WMA/MP3 files that have been saved to an SD Memory card by drag and drop. For details on how to record music, refer to P16.
Convenient functions
■ Auto power-off function In order to save power, the unit automatically turns off if left unused for more than 1 minute in [AUDIO] mode and *[VOICE PLAY] mode or if recording is left stopped for more than 10 minutes in *[VOICE REC] mode.
*SV-SD370V/SV-SD570V only
- In the auto power-off function, press ▶/■ to turn the power on again. Play starts automatically from where it was last stopped.
■ Resume function
Play resumes from where it was last stopped.
- If you change the SD Memory Card, this function is cancelled.
- If you record an FM file or a Voice file and then start play in [VOICE PLAY] mode, the resume function is cancelled and play starts from the recorded file. (SV-SD370V/ SV-SD570V only)
■ Adjusting the volume (0–25)
Increase: Press +
Decrease: Press —
■ HOLD function
If the HOLD switch is moved in the direction of [▲], [HOLD] displayed and the unit stops responding when a button is pressed. This prevents operations such a play being interrupted.
- To release, return the HOLD switch to the original position.
Beep
If BEEP in [SYSTEM] is set to [ON] (P31), operations are signaled by beeps. The function is [ON] when this product is purchased.
2 Beeps
Fast-forward/Skip (▶▶)
3 Beeps
Fast-rewind/Skip (◀◀)
3 rapid Beeps
When you return to the first (last) item after displaying the last (first) item in a list or menu.
1 Beep and 1 long Beep
When you turn off the unit.
1 Beep
When you do any other operations such as play.
- Even if BEEP is set to [ON], a beep is not heard when you turn the power on.
- If BEEP is set to [ON], the sound will stop being output when you press an operation button during FM reception or Voice play. Set BEEP to [OFF] to prevent this. (SV-SD370V/SV-SD570V only)
Playing tracks (AUDIO mode)
- Insert an SD Memory card with recorded tracks.
- Insert earphones as far as it will go.
- Press ▶/■ to turn the power on.
When using SV-SD370V/SV-SD570V
1. Select [AUDIO] mode. (P25)
2. Press ▶/■ to start play.
- If the power is turned off in [AUDIO] mode, play starts automatically from where it was last stopped when the power is turned on again.
When using SV-SD310/SV-SD510
1. Turn the power on and play starts.
- Play starts automatically from where it was last stopped when the power is turned on.
■ Operations during play
| Stop Press ▶/■ | |
| Review or cue to the beginning of tracks (Skip) | Press |◀◀ or ▶▶| briefly |
| Fast-rewind/ Fast-forward (Search) | Press and hold |◀◀ or ▶▶| |
■ Operations while stopped
If | is pressed, the beginning of the track or the previous track is selected. If | | is pressed, the next track is selected. Press
▶/■ to start play.

- Tracks recorded on an SD Memory card cannot be erased selectively. Use SD-Jukebox or an SD Stereo System to erase them. For details on how to use SD-Jukebox to erase tracks, refer to the PDF operating instructions.
■ Selecting the track to play
- Press .

-
Press |◀◀ or ▶▶| to select an item and then press ▶/■.
-
If you select [PLAYLIST] etc. when there is more than 1 playlist, press + or - to select the playlist you want to play and then press ▶/■.
- Select an item from the following items.
- [NO LIST] is displayed if there are no playlists in the selected item and [NO MARKED TRACK] is displayed if there are no marked tracks in the selected item.
INT. SEARCH
Select a playlist by an initial letter search. For details, refer to P29.
ALL TRACKS
Play all the tracks.
PL PLAYLIST
Select a playlist created with SD-Jukebox (includes playlists created below headings such as [ALBUM] and [ARTIST]).
- Playlists can be displayed by pressing and holding S (approximately 2 seconds or more).
- For details on how to create a playlist, refer to the PDF operating instructions for SD-Jukebox.
BEST TRACKS
Select tracks classified in BEST TRACKS by a Panasonic device with the BEST TRACKS function.
- This is not displayed when no track is classified in [BEST TRACKS].
- During play, [BEST TRACKS] is displayed as a playlist name.
ARTIST
Select the playlist classified into the [ARTIST] playlist in SD-Jukebox.
ALBUM
Select the playlist classified into the [ALBUM] playlist in SD-Jukebox.

MOOD
Select a playlist classified with the Music Sommelier (Mood Analyzer) function in SD-Jukebox.

MARKED TRACK
Select tracks from marked tracks. (P32)
- During play, [MARKED TRACK] is displayed as a playlist name.
■ [INT. SEARCH] Function
If you select [INT. SEARCH], you can search through the names of playlists displayed in order of initial letter etc.
- You can use this function to search through playlist names only. It cannot be used to search through track names.
-
Press .
-
Press |◀◀ or ▶▶| to select [INT. SEARCH] and then press ▶/■.
![PANASONIC D-Snap SV-SD370V - ■ [INT. SEARCH] Function - 1](/content/2026/05/806659/images/1818dd3a01789028aadc954b64c21813474e350c35f45acf9297a469c77e3457.jpg)
- Press |◀◀ or ▶▶| to select a tab Ⓐ.
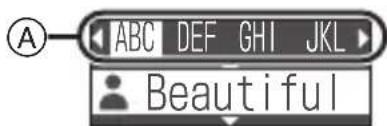
- The last tab displayed is "etc." tab for playlists with an initial number etc.
-
You cannot select a tab if there are no playlists in it.
-
Press + or - to select a playlist and then press ▶/■.
-
Each time you press + or -, the selected playlist changes.
- If you keep pressing – (+) after the last (first) playlist name in a tab is displayed, the next (previous) tab is displayed. (Tabs with playlists that have not been classified are skipped.)
![PANASONIC D-Snap SV-SD370V - ■ [INT. SEARCH] Function - 3](/content/2026/05/806659/images/8ff4af66c26942898fdb3b19b6fb7e8cf893ed83de724a40e13bbb51f506cb49.jpg)
- If a playlist name has not been entered using half-width characters, it is classified in the "etc." tab.
■ [AUDIO SET] menu
- Pressn .
- Press |◀◀ or ▶▶| to select [AUDIO SET] and then press ▶/■. (SV-SD370V/SV-SD570V only)
- Press + or - to select an item and then press ▶/■.
- Repeat this step to select other items.
[PLAY MODE]
• [NORMAL]:
Plays in order the tracks in a selected playlist
• [ONE REPEAT]:
Repeats 1 track
- [ALL REPEAT]:
Repeats all tracks in a selected playlist
• [A-B REPEAT] (During play only):
Repeats between two points (AB) in the same track
• [RANDOM]:
Random repeats all tracks in a selected playlist
- [INTRO PLAY] (Only while stopped):
Plays the first 10 seconds of each track in a selected playlist in order
— During [INTRO PLAY], press ▶/■ to start play and press MARK to register as a marked track. (P32)
To set the section to repeat in [A-B REPEAT]
- Select [A-B REPEAT] during play.
-
Press ▶/■ at the start point (A) and once more at the end point (B) in the same track.
-
The section that you set must be more than 1 second.
- It may not be possible to set the start point (A) during play if the track is near the end (approximately 5 seconds).
- This is cancelled if skip or stop is selected.
[EQ]
• [NORMAL]: Normal
• [S-XBS1]: Add powerful bass
• [S-XBS2]: Enhanced
[S-XBS1] effect
• [TRAIN]: Reduces sound leaks and listening fatigue
[EFFECT]
- [RE-MASTER]: Compensates for high frequencies lost through compressed recording
— This effect may be less with high bit rates.
• [P.SRD1]: Personal surround (3D sound field with presence)
• [P.SRD2]: Enhanced
[P.SRD1] effect
• [OFF]: Normal
— Noise may be heard when some EQ and EFFECT settings are combined.
[DISP. ITEM]
• [TITLE&PL]:
Displays track title and playlist title
- [TITLE&ARTIST]: Displays track title and artist name
- [TITLE&INFO]: Displays track title and track information (codec and sampling rate)
• [COUNTER]: Displays play time
[RESET MARK]
Press + or - to select [YES] to reset the registered mark.
— When you set [AUDIO SEARCH] to [MARKED TRACK] and then play a track (P29), [RESET MARK] is not displayed.
— If the registered mark cannot be reset on this unit, select [PRIVATE]→[MEIGROUP]→[SDPLAYER] in the SD Memory card on the PC. Select [MARKLIST.LST] in [SDPLAYER] and then delete it.
[SYSTEM]
The settings on this unit can be changed.
• BEEP — [ON]: A beep is heard when you press an operation button. — [OFF]: A beep is not heard.
- [LANGUAGE] — [ENGLISH]: English — [简体中文] : Simplified Chinese — [繁體中文] : Traditional Chinese
- [INITIALIZE] (Only while stopped) Press + or - to select [YES] to return settings to the default settings. - All the preset stations are deleted.*
[MODE] select*: AUDIO
[FILE NAME] ([VOICE PLAY] mode*)
[STEREO/MONO] (Tuner)*: [STEREO] [TUNING MODE]*: [MANUAL] [FM DISP. SET]*: [FM DISP. 1] Volume: 12 *SV-SD370V/SV-SD570V only
- [VERSION] The unit version can be confirmed.
Grouping favourite tracks (Registering marks)
Register marks in advance to make selecting tracks simpler.
- Press ▶/■ to turn the power on.
- (SV-SD370V/SV-SD570V only) Select [AUDIO] mode. (P25)
- During play or while stopped, select the track to be registered as a marked track.
- Press MARK.
- [MARK REGISTERED] is displayed.
- Up to 99 tracks can be registered.
■ To play a marked track
- Press and hold MARK (for more than approximately 2 seconds).
- A list of the marked tracks is displayed.
-
Press + or - to select the track to play and then press ▶/■.
-
To play tracks other than marked tracks, press and then select [ALL TRACKS] etc. (P28)
- You can also play a marked track by pressing and then selecting [MARKED TRACK]. (P29)
To remove a mark
- Select the marked track (with ★).
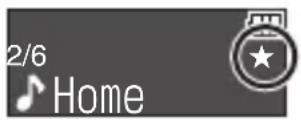
- Press MARK.
- Press + or - to select [YES] and then press ▶/■. (within 5 seconds)
- [MARK REMOVED] is displayed.
- All registered marks can be removed using the [RESET MARK] menu. (P31)

- If a mark is registered or removed during play, the information is written to the SD Memory card after play stops. Do not remove the SD Memory card or the rechargeable battery until writing is finished. (The information will not change.)
- It may not be possible to register or remove a mark during play if the track is near the end (approximately 5 seconds).
- Marks cannot be registered during [A-B REPEAT].
- Marks cannot be removed during [A-B REPEAT] and [INTRO PLAY].
only SV-SD370V SV-SD570V
Using the FM radio (FM TUNER mode)
- Insert earphones as far as it will go.
-
Press ▶/■ to turn the power on.
-
Select [FM TUNER] mode. (P25)
-
Press |◀◀ or ▶▶| to select the station.
- Press and hold for more than 2 seconds for automatic tuning. When the button is released the frequency starts scrolling and stops when a station is found.

- As the cord of the stereo earphones acts as the FM antenna, extend it as far as possible rather than leaving it coiled.
- When using earphones except the included ones, receiver sensitivity may decrease depending on the length of the earphone cord. (Noise is heard when using the strap holder with earphones. Use the stereo earphones. (SV-SD570V only))
- There may be an increase in noise when using this unit near a PC or other digital equipment.
-
In [FM TUNER] mode, the display panel and operation buttons (SV-SD570V only) light up for less time than in other modes.
-
Noise will be heard when indicators on the display panel light.
- The sound will stop being output while the [FM TUNER SET] menu is displayed.
- If the AC adaptor is connected during FM reception, the sound will stop being output for a while.
■ [FM TUNER SET] menu
- During FM reception, press m.
- Press |◀◀ or ▶▶| to select [FM TUNER SET] and then press ▶/■.
- Press + or - to select an item and then press ▶/■.
- Repeat this step to select other items.
[EQ]
• [NORMAL]: Normal
• [S-XBS]: Add powerful bass
[AUTO PRESET]
For details, refer to P34 “Presetting stations automatically (up to 20 stations)”.
[PRESET CH]
For details, refer to P34 “Presetting stations manually (up to 20 stations)”.
— Displayed when [TUNING MODE] is set to [MANUAL] only.
[ERASE CH]
Erase a selected preset channel.
Press + or - to select [YES] and then press ▶/■ to erase.
— Displayed when [TUNING MODE] is set to [PRESET] only.
[TUNING MODE]
• [MANUAL]:
You can select the stations (frequencies) manually. (P34)
• [PRESET]:
You can select the preset stations.
[STEREO/MONO]
• [STEREO]:
To receive as auto stereo (Even if the reception is monaural, [MONO not displayed.)
• [MONO]:
To receive as monaural ([ MONO is displayed.)
— [MONO] is selected to reduce noise when reception is weak.
[FM DISP. SET]
• [FM DISP. 1]:
This is set when the product is purchased.
• [FM DISP. 2]:
The display panel lights as little as possible to reduce noise more than when [FM DISP. 1] is set.
— The display will not turn on even if you adjust the volume or slide the HOLD switch. (The display will not turn on, however you can operate the unit.) If you are using SV-SD570V, the operation buttons will also not light up when adjusting the volume.
— If you want to check indicators on the display panel, press S to turn on the display. If the HOLD function is on, release it by returning the HOLD switch to the original position before pressing S.
— If the HOLD function is on, [HOLD] is not displayed when operation buttons are pressed.
[SYSTEM]
Refer to [SYSTEM] in the [AUDIO SET] menu. (P31)
■ Presetting stations automatically (up to 20 stations)
- Select [AUTO PRESET] from the [FM TUNER SET] menu and then press ▶/■. (P33)
- The tuner automatically presets the stations it can receive into the channels in order.
![PANASONIC D-Snap SV-SD370V - [SYSTEM] - 1](/content/2026/05/806659/images/d384730bf1cb8525b062e43607c1456578751cee408af0db1a54d98b726f65ee.jpg)
![PANASONIC D-Snap SV-SD370V - [SYSTEM] - 2](/content/2026/05/806659/images/f4e27c8d99b3019deb70b48956948bf912d44db99615cc75b45458a42c711e81.jpg)
- After presetting stations, an icon such as [ ] is displayed.
- When finished, the first station memorized is displayed. [TUNING MODE] is set to [PRESET].
■ Selecting the preset stations
Press ◀◀◀ or ▶▶◀ to select a station.
![PANASONIC D-Snap SV-SD370V - [SYSTEM] - 3](/content/2026/05/806659/images/e31adc7c2fe8a99f8295fada24615bc93adf2d4364e2d54edaa0c1367b173ebe.jpg)
- It takes approximately 2 minutes to preset the stations. (Depending on the reception, it may take longer.)
- Auto Preset may not function if reception is weak or there is excessive noise. If an unwanted frequency or noise is occupying a channel, delete the channel with [ERASE CH] (P33) and manually preset stations again.
■ Presetting stations manually (up to 20 stations)
- Select [TUNING MODE] from the [FM TUNER SET] menu and then press ▶/■. (P33)
![PANASONIC D-Snap SV-SD370V - [SYSTEM] - 4](/content/2026/05/806659/images/eb6c3f7c3cc51fbba1b950d554ec757ce2e60139df1da096bab3c49231469260.jpg)
- Press + or - to select [MANUAL] and then press ▶/■.
- Press |◀◀ or ▶▶| to select the frequency to preset.
- Select [PRESET CH] from the [FM TUNER SET] menu and then press ▶/■. (P33)
![PANASONIC D-Snap SV-SD370V - [SYSTEM] - 5](/content/2026/05/806659/images/676953ccbea5081fa12fb6288d2be430ffaf44ffa4c11faa983f64e440156572.jpg)
- Press + or — to select channel and then press ▶/■.
- Repeat steps 3 to 5 for presetting more stations.
■ Selecting the preset stations
When Preset Memory is finished, set [TUNING MODE] to [PRESET] and then press ◀◀◀ or ▶▶◀ to select a station. An icon such as [■] is displayed.
- Insert an SD Memory card with free space on it.
-
Press ▶/■ to turn the power on.
-
During FM reception, press MARK.

- The status indicator lights up so you can check the status of the unit.
-
Press MARK (within 1 minute).
-
Recording starts. (Press ▶/■ or MARK to stop recording.)
- Press to not record.
- During recording, each time you press the display changes: recording time → remaining time → file name.

- After recording an FM file, play it in [VOICE PLAY] mode. (P37)
- Noise may be recorded if you adjust the volume while recording.
- Recorded FM files are saved with the file name [TUNERxxx].
- You can record files from [TUNER001] to [TUNER300].
- For details on file names and recording counters, refer to “About file names” in [VOICE REC] mode.

Voice recording (VOICE REC mode)
- Insert an SD Memory card with free space on it.
-
Press ▶/■ to turn the power on.
-
Select [VOICE REC] mode. (P25)
-
Press MARK, face the microphone and record.
-
Press ▶/■ or MARK to stop recording.
- During recording, each time you press the display changes: recording time → remaining time→ file name.

- Do not cover the microphone during recording.
■ About file names
The “xxx” in a [VOICExxx] ([TUNERxxx]) file name is the recording counter. It increases by 1 from [001] to [300] each time a recording is made. Even if you erase selected files, the recording counter of the next file recorded is 1 more than the last file recorded and you cannot record any more files when the counter number reaches [300]. In this case, erase unwanted files and then select [RENUMBER] to renumber the recording counter of all the recorded files.
[Non-Text]
- The recorded sound is automatically set in [VOICE REC] mode. You cannot adjust the volume while recording.
- Recorded files are saved with the file name "VOICExxx".
- You can record files from [VOICE001] to [VOICE300].
■ About Recording (FM recording and Voice recording)
- This unit does not have a clock function so the recording date and time of files recorded on this unit is shown as [2006/01/01/00:00] on Voice Editing. The recording date and time can be changed on Voice Editing, however the file format must be converted from a WAVE file to a VM1 file. For details, refer to the PDF operating instructions for Voice Editing.
- One file can be recorded continuously for up to approximately 12 hours. (Recording stops automatically about 12 hours after it starts.)
- When the remaining memory becomes less than 10 minutes while recording, the status indicator starts flashing more rapidly.
- Recorded files are monaural.
■ [REC SET] menu
- Press
- Press |◀◀ or ▶▶| to select [REC SET] and then press ▶/■.
- Press + or - to select an item and then press ▶/■.
- Repeat this step to select other items.
[RENUMBER]
All the voice file names and tuner file names on the card are renumbered in order from [001]. Press + or - to select [YES] and then press ▶/■.
If [YES] is selected, a confirmation screen is displayed. Press + or - to select [YES] and then press ▶/■.
[ERASE ALL]
Erases all the voice files and tuner files which can be played back on this unit.
Press + or - to select [YES] and then press ▶/■.
If [YES] is selected, a confirmation screen is displayed. Press+ or - to select [YES] and then press ▶/■.
- Erasing files may take time if there is a large number of files. Use the rechargeable battery and AC adaptor together, or use the fully charged rechargeable battery.
[CARD FORMAT]
You can use this unit to format cards.
All the data on the card will be erased if it is formatted.
-
Select [CARD FORMAT] from the [REC SET] mode menu.
-
Press + or - to select [YES] and then press ▶/■. (Repeat twice.)

flowchart
graph LR
    A["FORMAT CARD?"] --> B["SURE?"]
    C["YES"] --> B["SURE?"]
- “FORMAT END” appears when formatting is completed.
- Use the rechargeable battery and AC adaptor together, or use the fully charged rechargeable battery.
[SYSTEM]
Refer to [SYSTEM] in the [AUDIO SET] menu. (P31)

Tuner recording and Voice recording files can be played.
- Press ▶ /■ to turn the power on.
- Select [VOICE PLAY] mode. (P25)
- If there are a lot of playable files in the SD Memory card, it may take time to display the play screen when switching modes, turning the power on etc.
- Press ▶/■ to start play.
- If the power is turned off in [VOICE PLAY] mode, play starts automatically from where it was last stopped when the power is turned on again.
■ Operations during play
| Stop Press ▶/■ | |
| Review or cue to the beginning of tracks (Skip) | Press |◀◀ or ▶▶| briefly |
| Fast-rewind/Fast-forward (Search) | Press and hold |◀◀ or ▶▶| |
■ Operations while stopped
If ◀◀◀ is pressed, the beginning of the file or the previous file is selected. If ▶▶▶| is pressed, the next file is selected. Press ▶/■ to start play.

- Files with file names other than [VOICE001] to [VOICE300] and [TUNER001] to [TUNER300] cannot be played or erased on this unit.
- It is recommended that you use Voice Editing to save voice files recorded on this unit to a PC.
■ Selecting the file to play
- Press .
- Press |◀◀ or ▶▶| to select an item and then press ▶/■.
ALL ALL FILES
Plays all files compatible with this unit. All the voice files and then all the tuner files are played.
VOICE VOICE FILE
Plays files saved with the file name [VOICExxx] such as files recorded in [VOICE REC] mode on this unit.
TUNER TUNER FILE
Plays files saved with the file name [TUNERxxx] such as FM files recorded on this unit.
■ [VOICE SET] menu
- Pressn .
- Press |◀◀ or ▶▶| to select [VOICE SET] and then press ▶/■.
3. Press + or - to select an item and then press ▶/■.
- Repeat this step to select other items.
[PLAY MODE]
• [NORMAL]: Plays in order from the selected file
• [ONE REPEAT]: Repeats 1 file
• [ALL REPEAT]: Repeats all files
- [A-B REPEAT]:
Repeats between two points (AB) in the same file
— Refer to “To set the section to repeat in [A-B REPEAT]” (P30). ([A-B REPEAT] can only be set during play.)
[ERASE ONE] (While stopped only) Erasing a selected file.
Press + or - to select [YES] and then press ▶/■.
[ERASE ALL] (While stopped only) Erases all the voice files and tuner files which can be played back on this unit. Refer to [ERASE ALL] in the [VOICE REC] mode menu. (P37)
- Erasing files may take time if there is a large number of files. Use the rechargeable battery and AC adaptor together, or use the fully charged rechargeable battery.
[DISP. ITEM]
- [FILE NAME]: Displays file name
• [COUNTER]: Displays play time
[SYSTEM]
Refer to [SYSTEM] in the [AUDIO SET] menu. (P31)
Mode menus

flowchart
graph TD
    A["[AUDIO SET"]] --> B["[PLAY MODE"]]
    A --> C["[EQ"]]
    A --> D["[EFFECT"]]
    A --> E["[DISP. ITEM"]]
    A --> F["[RESET MARK"]]
    A --> G["[SYSTEM"]]

    H["[FM TUNER SET"]] --> I["[EQ"]]
    H --> J["[AUTO PRESET"]]
    H --> K["[PRESET CH"]*3]
    H --> L["[ERASE CH"]*4]
    H --> M["[TUNING MODE"]]
    H --> N["[STEREO/MONO"]]
    H --> O["[FM DISP. SET"]]
    H --> P["[SYSTEM"]*5]

    Q["[SV-SD370V\nSV-SD570V only"]] --> R["[NORMAL"]]
    Q --> S["[S-XBS"]]

    T["[LANGUAGE"]] --> U["[ON"]]
    T --> V["[OFF"]]

    W["[INVALIDE"]*2] --> X["[ENGLISH"]]
    W --> Y["[简体中文"]]
    W --> Z["[繁體中文"]]

    style A fill:#f9f,stroke:#333
    style H fill:#f9f,stroke:#333
    style Q fill:#f9f,stroke:#333

flowchart
graph TD
    A["REC SET"] --> B["VOICE SET"]
    B --> C1["SV-SD370V"]
    B --> C2["SV-SD570V only"]
    C1 --> D1["RENUMBER"]
    C1 --> D2["ERASE ALL"]
    C1 --> D3["CARD FORMAT"]
    C1 --> D4["SYSTEM"]*5
    E["VOICE SET"] --> F1["PLAY MODE"]
    E --> F2["ERASE ONE"]*2]
    E --> F3["ERASE ALL"]*2]
    E --> F4["DISP. ITEM"]
    E --> F5["SYSTEM"]*5
    F1 --> G1["NORMAL"]
    F1 --> G2["ONE REPEAT"]
    F1 --> G3["ALL REPEAT"]
    F1 --> G4["A-B REPEAT"]*1
    F2 --> H1["FILE NAME"]
    F2 --> H2["COUNTER"]
*1 Only during play
*2 Only while stopped
*3 [TUNING MODE] is set to [MANUAL] only
*4 [TUNING MODE] is set to [PRESET] only
*5 The same as [SYSTEM] in the [AUDIO SET] menu
Indications
[AUDIO] mode

1. EQ
S-XBS1 : [S-XBS1]
S-XBS2 : [S-XBS2]
TRAIN : [ T R A I N ]
2. EFFECT
RM : [RE-MASTER]
P.SRD1 : [P.SRD1]
P.SRD2 : [P.SRD2]
3. PLAY MODE
: [ONE REPEAT]
: [ALL REPEAT]
AB : [A-B REPEAT]
∞ : [RANDOM]
INTRO : [INTRO PLAY]
-
Remaining battery power
-
Registering marks
-
Display items
[TITLE&PL]
[TITLE&ARTIST]
[TITLE&INFO]
[COUNTER]
- If an item is long, the display panel scrolls to display all the items and then displays the first part of it.
- The play time is displayed if DISP. ITEM in the [AUDIO SET] menu is set to [COUNTER].
-
Play indication (during play): ▶ Mode (while stopped): ♪
-
Current track number/Total number of tracks
[FM TUNER] mode
(SV-SD370V/SV-SD570V only)

-
Mode
-
Presetting stations
-
EQ
S-XBS : S-XBS
-
Remaining battery power
-
FM audio
MONO : Monaural
[VOICE REC] mode
(SV-SD370V/SV-SD570V only)

-
Mode
-
Remaining battery power
-
Remaining recording time
-
Recording status
●: While recording
■: While recording is stopped
[VOICE PLAY] mode
(SV-SD370V/SV-SD570V only)

-
Mode
-
Playable files
VOICE : Voice file
TUNER : FM tuner recording file
- PLAY MODE
![1 : [ONE REPEAT] ALL : [ALL REPEAT] AB : [A-B REPEAT]](/content/2026/05/806659/images/2fca17339b34dba41bfd0e3d2c19fa8033163c0be7bc87086ad0c081e0001726.jpg)
-
Remaining battery power
-
File name
- If DISP. ITEM in the [VOICE SET] menu is set to [FILE NAME].
File play time
- If DISP. ITEM in the [VOICE SET] menu is set to [COUNTER].
- Play indication (during play)
Mode (while stopped)
▶: While playing
: While stopped
- Current file number/Total number of files
■ When one of the following messages appears on the display
| ACCESSING CARD ● | Do not remove the SD Memory card. |
| CARD LOCKED BY PASSWORD | ● The SD Memory card is protected with a password so that recording and play are not possible. Cancel the protection on a PC. |
| HOLD ● The HOLD $ | switch is on. (P27) |
| ERROR | ● An error has occurred. Reinsert the SD Memory card and turn the power on again. If this does not remedy the situation, remove and reinsert the battery. |
Care and use
■ Main unit/included accessories
- Keep the SD Memory card and the rechargeable battery out of the reach of children when you remove them from the unit. Children may swallow them.
- Do not let reflected light hit people. (SV-SD570V/SV-SD510 only)
Lights reflects from this unit's display like a mirror. It can thus get into the eyes of people who are operating a vehicle etc. If it is used under direct sunlight or strong light, this causes an accident.
Be careful about how you hold the unit.
- When carrying the unit, do not drop or bump it. Also, do not put it in the pockets of your pants.
A strong impact can break the unit's casing causing the unit to malfunction.
- Do not put a lot of pressure on the unit if you place it in a bag with the cord of the earphones wrapped around it. The display panel may be broken.
- Do not let rain or drops of water splash on the unit. Be careful not to let water splash on this unit if you wash your hands when using the strap.
- Discontinue use if you experience discomfort with the earphones or any other parts that directly contact your skin. Continued use may cause rashes or other allergic reactions.
- Leave some slack in the cord of the earphones and the strap if you wind them around the unit.
- Clean with a soft, dry cloth.
- Do not use any type of abrasive pad, scouring powder or solvent such as alcohol or benzine.
Do not:
- disassemble, remodel, drop, or allow the unit to get wet.
- use or store in locations directly exposed to sunlight, a heat vent, or a heating appliance.
- use or store in humid or dusty locations.
- use or store in locations exposed to corrosive gases.
- insert objects other than SD Memory cards and rechargeable battery.
- use force to open the battery lid.
• use cracked or warped cards - short-circuit the power supply terminals of the AC adaptor.
- detach the label on the card or attach other labels or stickers.
- play your headphones or earphones at a high volume.
About the status indicator
Intervals of about 3 seconds
During Audio play, Voice play* and Tuner reception*
Intervals of about 1 second (on for about 0.5 seconds and off for about 0.5 seconds)
While writing to the SD Memory card (registering marks, formatting *, Tuner recording*, Voice recording* etc.)
- When the remaining memory becomes less than 10 minutes while recording, the status indicator starts flashing more rapidly.
Intervals of about 2 seconds
During charging the battery (If the unit is turned off before charging)
Light up
While stopped, while waiting for recording to start* and when charging from the PC is finished.
*SV-SD370V/SV-SD570V only
■ Rechargeable battery
- Remove the battery if the unit is not to be used for a long time.
- Carry and store the rechargeable battery in the included rechargeable-battery case to prevent contact with metal objects.
Do not:
- disassemble, short-circuit, or put in a fire or water.
- peel off the cover or use if the cover has been peeled off.
Mishandling of batteries can cause electrolyte leakage which can damage items the fluid contacts and may cause a fire.
If electrolyte leaks from the battery, consult your dealer.
Wash thoroughly with water if electrolyte comes in contact with any part of your body.
Troubleshooting guide
No operation.
• Is the hold function on? (P27)
- Has the battery run down? (P23)
(If the battery has not run down, try removing and re-inserting it.)
- Are the connections for the rechargeable battery dirty?
Play time is short after recharging.
- This may occur the first time you recharge the battery or if you have not used it for a long time. Play time should be restored after a few recharges.
- If play is extremely short even after fully recharging the battery, the battery may have exceeded its life. Rechargeable battery can be recharged approximately 300 times.
Cannot hear sound.
• Is the volume too low? (P26)
- Is the earphone plug inserted correctly? (Try plugging it in again.) When using the strap holder with earphones, check that the plug is inserted as far as it will go. (SV-SD570V only)
• Is the earphone plug dirty?
Mark registering/removing, FM recording ^* or Voice recording ^* are impossible.
- Is the remaining battery power indication blinking? (P23) (Connect the AC adaptor or charge the rechargeable battery fully before operation. (P21, 24))
[INT. SEARCH] will not work properly.
- Have you entered the playlist names correctly?
No audio play.
- Are you trying to play a file that is not compatible with this unit? (P16)
- Did you use SD-Jukebox to record the music file? (You cannot play WMA/MP3 files even if you drag and drop them to an SD Memory card.)
Play does not start from the first track.
- Is the play mode set to [RANDOM]? (P30)
• Is the resume function on? (P26) - Have you selected a setting other than [ALL TRACKS] or [ALL FILES] ^* (P28, 38)?
There is a lot of noise.
- Are you using the unit near a television or mobile phone?
The AC adaptor or the unit becomes warm.
- It becomes slightly warm during charging. This is not a malfunction.
| Cannot use the SD Memory card. |
| Is the card's write-protect switch moved to the [LOCK] position?Has the card been formatted on a PC in a FAT32 file system or NTFS file system? (Format the card on this unit* or SD-Jukebox.) |
| The unit is not recognised by the PC. |
| Disconnect the USB cable and then reconnect it. |
| [ACCESSING] will not disappear while the unit is connected to a PC. (The status indicator continues blinking.) |
| If a NTFS format SD Memory card is inserted into the unit, log on to the PC again as “Administrator User” or a user with the same privileges, double click [My Computer], right click the [Removable Disk] icon and select [Eject]. Then disconnect the unit from the PC. |
| Cannot install the included CD-ROM. |
| Is the operating environment of your PC compatible with the CD-ROM? (P13) |
| It takes time to switch to recording the radio.* |
| It may take time to display the FM tuner recording start screen. |
| Noise is heard in [FM TUNER] mode.* |
| If you connect the AC adaptor, radio reception may be noisy or weak in [FM TUNER] mode.Even if the radio reception is good, noise appears while the indicators on the display panel light. The noise disappears when the display turns off.When using the strap holder with earphones, sensitivity will decrease and noise will be heard. Use the stereo earphones. (SV-SD570V only) |
| Cannot adjust the volume while recording in [VOICE REC] mode.* |
| The volume is automatically set. You cannot adjust the volume. |
| Sound decreases during [VOICE PLAY] mode.* |
| The recorded sound may decrease if an operation is performed during recording. |
| No voice play.* |
| You may not be able to play audio files on this unit if they were recorded on other D-snap Audio devices. Use Voice Editing to convert the format of the file. For details, refer to the operating instructions for Voice Editing (PDF file). |
| The recording date and time of files recorded on this unit is shown as [2006/01/01/00:00] on Voice Editing.* |
| This unit does not have a clock function so the recording date and time of files recorded on this unit is shown as [2006/01/01/00:00] on Voice Editing. (P36) |
Specifications
Supported sampling frequency:
AUDIO: 32 kHz, 44.1 kHz, and 48 kHz
VOICE *1: 8 kHz
Decoding/Encoding: AUDIO: AAC, WMA and MP3
VOICE *1: 16 bit linear PCM (WAVE file format)
No. of channels: AUDIO, FM TUNER Reception *1 :
Stereo, 2 channels
VOICE Rec/Play ^1 , FM TUNER Rec ^1 :
Mono, 1 channel
Frequency response: AUDIO: 20 Hz to 20,000 Hz (+0 dB, -6 dB)
VOICE *1: 120 Hz to 3,000 Hz
Radio Frequency range (FM) ^*1 :
87.5 MHz to 108.0 MHz (50 kHz steps)
Input ^*1 : Monaural microphone (built-in)
Output: 3.3 mW+3.3 mW (16 Ω, ∅ 3.5 mm stereo mini jack)
Power supply: Rechargeable battery: DC 1.2 V
Full charging time (Rechargeable battery (included)):
When using the AC adaptor/Approx. 1 hour 30 minutes
Battery duration (Rechargeable battery):
SD audio continuous playback (Using a
Panasonic SD Memory card, the stereo
earphones, EQ is [NORMAL], EFFECT is
[OFF] and recommended bit rate
(AAC: 96 kbps).): Approx. 25 hours
FM TUNER Reception ^*1 : Approx. 8 hours
FM TUNER Rec ^*1 : Approx. 4.5 hours
Voice play ^*1 : Approx. 20 hours
Voice Recording ^*1 : Approx. 7 hours
USB: USB 2.0 (Full Speed)
AC adaptor: Input: AC 110 V to 240 V, 50/60 Hz, 0.13 A
Output: D C 4.8 V, 1.0 A
Operating temperature: 0 °C to 40 °C
Charging temperature: 0 °C to 40 °C
Cabinet dimensions: SV-SD370V/SV-SD310
44.0 mm (W)×54.7 mm (H)×11.7 mm (D)
(excluding the projecting parts)
SV-SD570V/SV-SD510
45.0 mm (W)×57.5 mm (H)×15.0 mm (D)
(excluding the projecting parts)
Maximum dimensions: SV-SD370V/SV-SD310
Approx. 37.8 g (with rechargeable battery)
Approx. 25.3 g (without rechargeable battery)
SV-SD310
Approx. 37.4 g (with rechargeable battery)
Approx. 24.9 g (without rechargeable battery)
SV-SD570V
Approx. 37.5 g (with rechargeable battery)
Approx. 25.5 g (without rechargeable battery)
SV-SD510
Approx. 37.0 g (with rechargeable battery)
Approx. 25.0 g (without rechargeable battery)
Recording Media: SD Memory card (card capacities between
8MB and 2GB)
*1 SV-SD370V/SV-SD570V only
■ Standard recording times for Voice recording and FM recording (SV-SD370V/SV-SD570V only)
| Card memory | Recording time |
| 32 MB | 30 minutes |
| 64 MB | 1 hour |
| 128 MB | 2 hours |
| 256 MB | 4 hours |
| Card memory | Recording time |
| 512 MB | 8 hours |
| 1 GB | 16 hours |
| 2 GB | 33 hours |
- The times listed in the above tables are approximate.
- Up to 12 hours can be recorded continuously on a file.
- The recording times will become shorter if there are music files etc. on the SD Memory card.
- Specifications are subject to change without notice.
- The battery duration shown depends on operating conditions.
- Due to the limitations of font data, some characters cannot be displayed on this unit. (Characters that cannot be displayed are shown as “_”.) — Does not support to all character code.
- This unit is compatible with Windows Media Audio 9 (WMA9), though not with WMA9 Professional/Lossless/Voice and MBR ^*2 .
*2 Multiple Bit Rate: A file that contains the same content encoded at several different bit rates.

Matsushita Electric Industrial Co., Ltd.
Web site: http://www.panasonic.co.jp/global/

RQT8640-1B
F0306Re1046 ( 1500 Ⓑ )
- Panasonic®
- Operating Instructions
- SD Audio Player
- Contents
- Caution for AC mains lead
- CAUTION!
- IMPORTANT
- Before use
- How to replace the fuse
- Introduction
- Dear Customer
- WARNING:
- Insertion of connector
- -If you see this symbol-
- Information on Disposal for Users of Waste Electrical & Electronic Equipment (private households)
- For business users in the European Union
- Information on Disposal in other Countries outside the European Union
- For the United Kingdom and Republic of Ireland
- ■ Sales and Support Information
- Customer Care Centre
- Technical Support for AV Software
- Direct Sales at Panasonic UK
- Accessories
- SV-SD370V/SV-SD310
- SV-SD570V/SV-SD510
- □ Clip holder
- ① How to attach
- ② How to detach
- ■ Attaching/Detaching the strap holder with earphones (SV-SD570V only)
- Insert the plug for the strap holder with earphones into the earphones jack on the unit.
- Place the covers ② over the sides ① of the unit.
- ■ Attaching the arm band (SV-SD510 only)
- To prevent the unit from falling;
- ■ SD Memory card (not included)
- Location of Controls
- ■ SV-SD370V/SV-SD310
- Display panel
- Card lid
- Strap fixture
- 10.Status indicator
- 11.Operation buttons
- ▶/■ Play/Stop
- ▶▶ Skip/Search (Fast-forward)
- Skip/Search (Fast-rewind)
- ■ SV-SD570V/SV-SD510
- Operating environment for the software on the CD-ROM
- Personal computer:
- OS:
- Free hard disk space: 150 MB or more
- Drive: CD-ROM drive
- Interface: USB port
- Installing SD-Jukebox
- If Internet Explorer 6 or later is not installed on your PC, a confirmation screen is displayed.
- Click [SD-Jukebox Ver.5.1].
- ■ If the installer program does not start automatically
- Starting SD-Jukebox
- Double click on the SD-Jukebox icon on the desktop.
- ■ Take your music with you on an SD Memory card
- Recording CDs to your PC
- Transferring tracks from your PC to an SD Memory card
- ■ About the PDF operating instructions for SD-Jukebox
- Read the operating instructions (PDF file)
- If the PDF operating instructions do not open
- Installing Voice Editing
- If another edition of Voice Editing has already been installed in your PC
- Starting Voice Editing
- ■ About the PDF operating instructions for Voice Editing
- Connecting to a PC
- Insert a rechargeable battery and an SD Memory card.
- (P21, 24)
- Connect to the PC's USB terminal.
- ■ Disconnecting the USB cable
- ■ Data saving function
- ■ Folder structure of an SD Memory card used for this unit
- Formatting SD Memory card
- For details on how to format an SD Memory card, refer to the PDF operating instructions for SD-Jukebox.
- Power supply preparations
- Charge before initial use.
- Insert the rechargeable battery.
- Charge the rechargeable battery.
- Status indicator (If the unit is turned off before charging)
- ■ Charging from the PC
- Status indicator
- ■ Removing the rechargeable battery
- ■ Turning on/off the unit
- On: Press ▶/■.
- Off: Press and hold ▶/■ for more than approximately 2 seconds.
- ■ Battery indicator
- When the battery indicator is blinking
- ■ Using the AC adaptor
- Inserting and removing SD Memory card
- To remove the SD Memory card
- ■ SD Memory card write-protect switch
- ■ miniSD card
- How to use SV-SD370V/SV-SD570V (basic)
- ■ Turning on the unit
- ■ Changing the mode
- VOICE PLAY (P37)
- SET AUDIO SET (P30) (FM TUNER SET (P33), VOICE SET (P38), REC SET (P37))
- How to use SV-SD310/SV-SD510 (basic)
- ■ Turning on the unit/playing tracks
- Press ▶/■.
- The image is too blurry to recognize any text content.
- Convenient functions
- ■ Resume function
- ■ Adjusting the volume (0–25)
- ■ HOLD function
- Beep
- Beeps
- Beeps
- rapid Beeps
- Beep and 1 long Beep
- Beep
- Playing tracks (AUDIO mode)
- When using SV-SD370V/SV-SD570V
- Select [AUDIO] mode. (P25)
- Press ▶/■ to start play.
- When using SV-SD310/SV-SD510
- Turn the power on and play starts.
- ■ Operations during play
- ■ Operations while stopped
- ■ Selecting the track to play
- SEARCH
- ALL TRACKS
- PL PLAYLIST
- BEST TRACKS
- ARTIST
- ALBUM
- MOOD
- MARKED TRACK
- ■ [INT. SEARCH] Function
- ■ [AUDIO SET] menu
- [PLAY MODE]
- To set the section to repeat in [A-B REPEAT]
- [EQ]
- [EFFECT]
- [DISP. ITEM]
- [RESET MARK]
- [SYSTEM]
- Grouping favourite tracks (Registering marks)
- ■ To play a marked track
- To remove a mark
- Using the FM radio (FM TUNER mode)
- ■ [FM TUNER SET] menu
- [AUTO PRESET]
- [PRESET CH]
- [ERASE CH]
- [TUNING MODE]
- [STEREO/MONO]
- [FM DISP. SET]
- ■ Selecting the preset stations
- Voice recording (VOICE REC mode)
- ■ About file names
- [Non-Text]
- ■ About Recording (FM recording and Voice recording)
- ■ [REC SET] menu
- [RENUMBER]
- [ERASE ALL]
- [CARD FORMAT]
- All the data on the card will be erased if it is formatted.
- ■ Selecting the file to play
- ALL ALL FILES
- VOICE VOICE FILE
- TUNER TUNER FILE
- ■ [VOICE SET] menu
- Press + or - to select an item and then press ▶/■.
- Mode menus
- Indications
- [AUDIO] mode
- EQ
- EFFECT
- PLAY MODE
- [FM TUNER] mode
- (SV-SD370V/SV-SD570V only)
- ■ When one of the following messages appears on the display
- Care and use
- ■ Main unit/included accessories
- Do not:
- About the status indicator
- Intervals of about 3 seconds
- Intervals of about 1 second (on for about 0.5 seconds and off for about 0.5 seconds)
- Intervals of about 2 seconds
- Light up
- ■ Rechargeable battery
- Troubleshooting guide
- No operation.
- Play time is short after recharging.
- Cannot hear sound.
- Mark registering/removing, FM recording * or Voice recording * are impossible.
- [INT. SEARCH] will not work properly.
- No audio play.
- Play does not start from the first track.
- There is a lot of noise.
- The AC adaptor or the unit becomes warm.
- Specifications
- Supported sampling frequency:
- Maximum dimensions: SV-SD370V/SV-SD310
- SV-SD310
- SV-SD570V
- SV-SD510
- ■ Standard recording times for Voice recording and FM recording (SV-SD370V/SV-SD570V only)
- Matsushita Electric Industrial Co., Ltd.
- RQT8640-1B
Brand : PANASONIC
Model : D-Snap SV-SD370V
Category : Mp3 player